Ever found your prized cannabis buds turning purple, mushy, or moldy right when harvest time is near? If you have, you know how frustrating and costly this problem can be. Purple bud rot sneaks up on growers quietly, thriving in the kind of humid, moist conditions you might not even notice until the damage is severe.
Purple bud rot is a fast-spreading fungal disease that can wipe out your entire harvest if not caught early. Without swift, informed action, months of effort and investment can be lost overnight.
Understanding purple bud rot, how it develops, and the conditions that encourage its growth is essential for every cannabis cultivator. It’s equally important to recognize early signs before the problem spreads and to apply effective prevention and treatment methods to keep your plants healthy and maintain your yields.
This article will guide you through the causes and symptoms of purple bud rot, explore the environmental factors that promote its growth, and provide practical steps to prevent and manage this common but damaging disease.
Understanding Purple Bud Rot
Purple bud rot starts with a fungal infection caused by Botrytis cinerea. This fungus thrives in damp, humid environments, conditions you often find in dense, tightly packed buds. The tricky part is that it begins growing quietly inside the buds, hidden from your eyes. Because it stays out of sight at first, you might not notice anything wrong until the rot has spread deep, damaging your crop.
Purple bud rot can quickly ruin your entire harvest if you don't catch it early. That means keeping a close eye on your plants, managing humidity levels, and inspecting buds regularly. The earlier you spot it, the better your chances of saving your crop.
Here’s what you need to know about what causes it:
- High Humidity Levels: You must control humidity levels closely. Purple bud rot thrives in moist environments where humidity stays above 60%. When your grow room or outdoor area stays damp for too long, fungal spores can settle on your buds and quickly spread.
- Poor Air Circulation: Without good airflow, moisture hangs around your plants and creates the perfect breeding ground for mold. If your grow space has stagnant air, or if your plant canopy is too dense, you increase the risk of purple bud rot.
- Overwatering or Water Accumulation: You want to avoid overwatering your plants. Excess water can raise humidity and keep buds wet, encouraging fungal growth. Also, standing water or wet surfaces near your plants can increase the chance of infection.
- Temperature Fluctuations: Purple bud rot often develops when temperatures swing drastically between day and night. Cooler nighttime temperatures paired with warm, humid days allow condensation to form on buds. This wetness encourages rot.
- Damaged or Stressed Plants: If your plants suffer physical damage (e.g., broken branches or crushed buds) or stress (due to pests, nutrient deficiencies, or environmental factors), they become more vulnerable. Fungal spores can enter through wounds and colonize the tissue.
- Late Flowering Stage: Bud rot typically appears in the later flowering phase. At this stage, buds are denser and trap moisture inside, especially if you grow strains with tightly packed colas. That trapped moisture becomes a hotspot for purple bud rot.
- Contaminated Tools or Environment: Keep tools and your grow space clean. Spores can hitch a ride on pruning shears, gloves, or even clothes. Contaminated environments increase the chance of infection spreading.
So, how do you identify purple bud rot in cannabis? Let us understand this below.
Signs of Purple Bud Rot In Cannabis
If you grow cannabis, you need to spot purple bud rot early. If you miss the warning signs, this fungal disease can quickly destroy your crop. Here’s what you should look for:
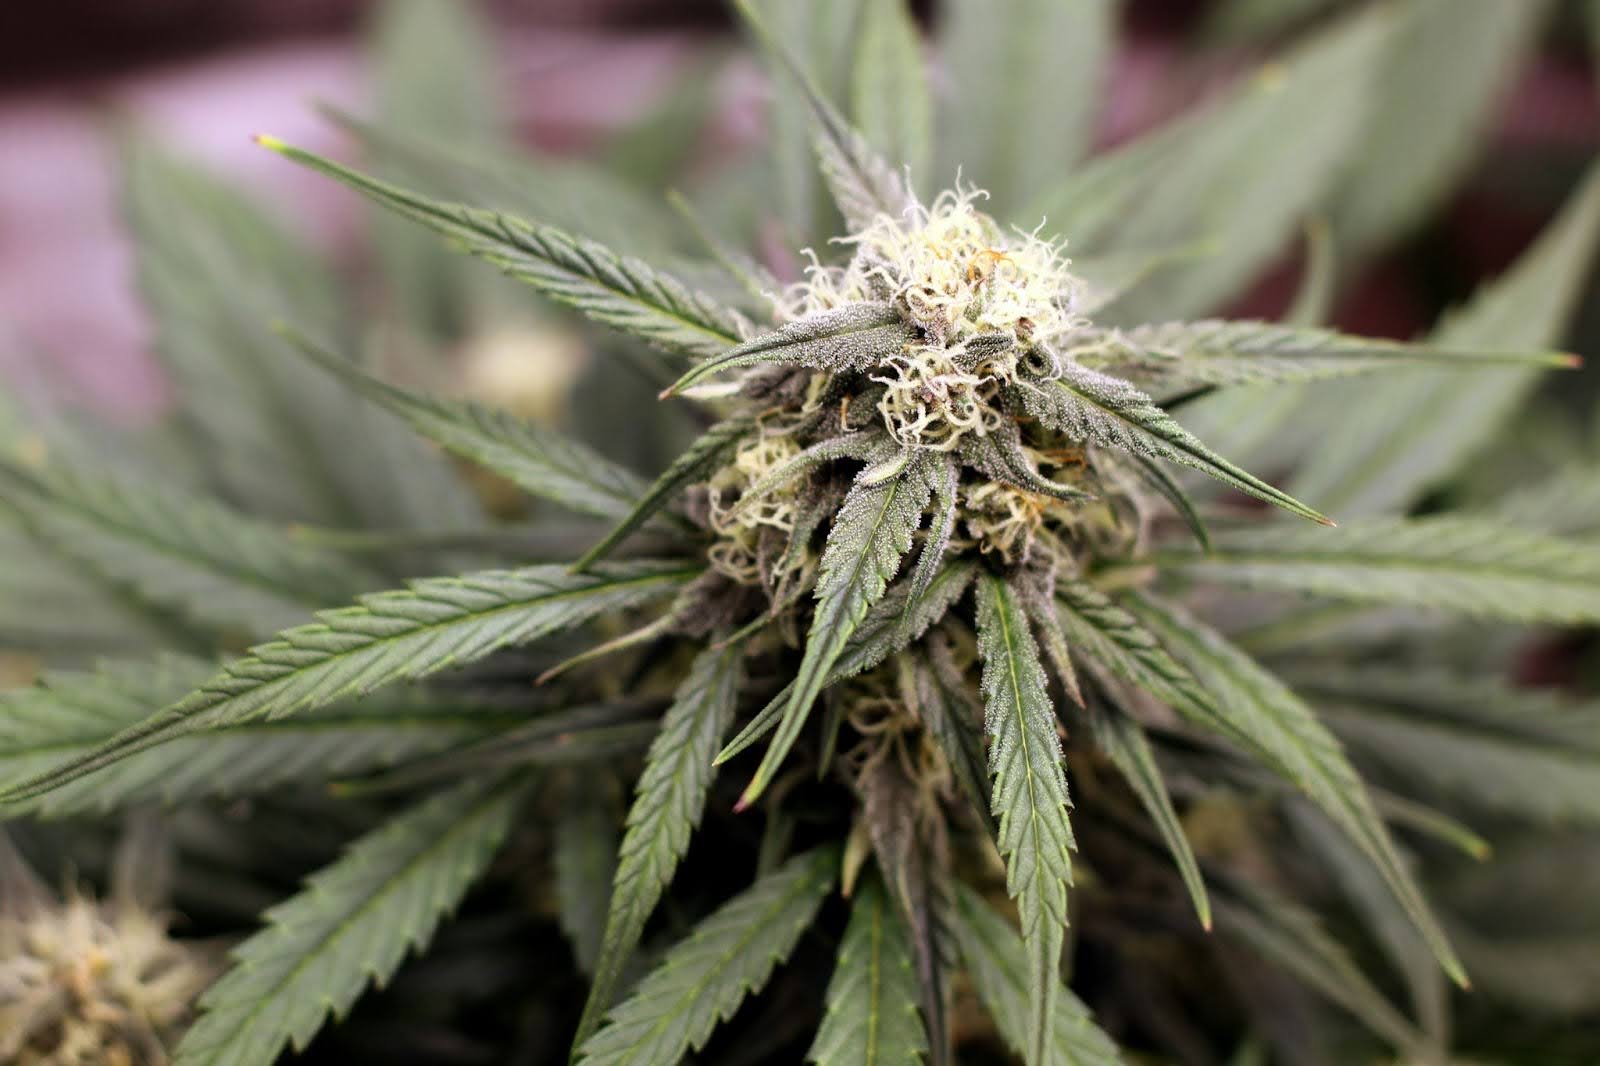
- Purple or Dark Discoloration on Buds: You will often see a distinct purple, dark brown, or black discoloration starting on your cannabis buds. Unlike normal coloration or strain-specific purpling, this rot spreads rapidly and looks wet or slimy at first. Pay close attention to any abnormal dark patches that appear suddenly.
- Fuzzy Gray or White Mold Growth: Underneath the discoloration, you might notice fuzzy, grayish-white mold developing on the buds. This mold is a clear indicator of fungal infection, commonly Botrytis cinerea, which causes bud rot. Check tight bud sites and inner branches thoroughly, especially if humidity is high.
- Bud Shrinkage and Softening: The affected buds will lose their firmness as the rot progresses. You’ll feel soft, spongy areas when you touch them. The buds will also shrink and look hollowed out or collapsed because the fungal infection breaks down the plant tissue.
- Unpleasant Musty or Moldy Odor: If your buds start to emit a musty, moldy, or damp smell, it’s a red flag. Healthy cannabis has a pungent, pleasant aroma. Bud rot changes this smell dramatically — you might even notice a slight sour or earthy scent that is off-putting.
- Leaf Yellowing and Wilting Near Infected Buds: Look at the leaves closest to infected buds. They might yellow, wilt, or die prematurely. This happens because the fungus disrupts the nutrient and water flow in the plant.
- Presence of Blackened or Dried Stems: Sometimes, the infection extends into stems near the buds, causing them to blacken or dry out. If you find dead, brittle stems attached to discolored buds, you likely have bud rot.
- Rapid Spread After High Humidity or Rain: You’ll notice purple bud rot tends to spread faster after periods of high humidity, rain, or poor air circulation. If your grow environment is too moist, keep an eye out for these symptoms — rot can spread to healthy buds within days.
So, how do you stop purple bud rot in your cannabis plant? Here's how you can do it.
How To Stop Purple Bud Rot In Cannabis
Purple bud rot is one of the most frustrating and destructive diseases you can encounter when growing cannabis. This fungal infection can spread rapidly and ruin your entire harvest if you don’t take immediate action. Here’s a detailed breakdown of steps you can take to stop purple bud rot and protect your crop.
1. Identify the Early Signs
Early detection is your first and most critical step. Purple bud rot typically begins as small purplish or grayish spots on the buds, often hard to spot at first glance. As it progresses, those spots become soft and mushy, and you might see a fuzzy gray or white mold developing. Sometimes, the infected buds also emit a musty or moldy smell, which is a strong indicator of fungal presence.
What to Do: Inspect your plants thoroughly every day, especially during and after humid or rainy weather. Use a magnifying glass or jeweler’s loupe to look closely at the buds, focusing on the inner parts where airflow is limited. If you detect any suspicious spots or mold, remove the affected buds immediately using sterilized scissors to prevent spores from spreading to healthy plant parts.
2. Improve Air Circulation
Stagnant air is a huge factor that encourages fungal growth. When air doesn’t move around your plants properly, moisture clings to buds and leaves, creating an ideal microclimate for bud rot spores to settle and multiply. This is especially common in dense canopies or indoor grow tents without sufficient airflow.
What to Do: Set up oscillating fans that can continuously move air around your plants, preventing humidity buildup in tight spots. Position fans at different levels – some near the canopy and others closer to the soil – to ensure even circulation. If you grow indoors, install an exhaust system to remove hot, humid air and bring in fresh air regularly. Also, remove or prune any leaves and branches that block airflow inside your plants’ canopy, focusing especially on the lower buds that are prone to rot.
3. Control Humidity Levels
Humidity plays a pivotal role in the development of bud rot. Cannabis buds are dense and can trap moisture, so when relative humidity rises above 50-60%, spores have the moisture they need to germinate and invade your buds. High nighttime humidity is particularly dangerous, as cooler temperatures allow moisture to settle and persist.
What to Do: Use a reliable hygrometer to continuously monitor humidity inside your grow space or greenhouse. During the flowering stage, aim to keep humidity between 40% and 50%. If humidity rises, deploy a dehumidifier to remove excess moisture from the air. For outdoor growers, avoid watering in the late afternoon or evening to prevent moisture from lingering overnight. Also, consider using fans or other ventilation techniques in your greenhouse or grow tent to lower humidity if possible.
4. Avoid Overwatering
Overwatering not only harms root health but also increases ambient humidity and keeps plant surfaces damp for extended periods. When buds and leaves remain wet for too long, fungal spores find it easier to settle and infect the plant tissues.
What to Do: Water your cannabis plants only when the top inch of soil feels dry to the touch. Make sure your soil or growing medium drains well, and use pots with adequate drainage holes to prevent waterlogging. Water your plants early in the day so that any moisture on leaves and buds has time to evaporate before nighttime. If you notice consistently wet conditions in your grow medium, consider improving your soil mix or switching to a lighter substrate.
To help you stay on top of care routines, PlanaCan makes task scheduling simple. You can automate your entire grow cycle using customizable templates for specific strains or harvests. With just a few clicks, you can add daily tasks like watering and moisture checks to an interactive calendar. It keeps your workflow consistent, your environment balanced, and your whole team aligned on what needs to be done.
5. Prune and Thin Your Plants
Thick, crowded foliage traps moisture and reduces airflow inside the plant canopy, making inner buds extremely vulnerable to rot. Overgrown plants with overlapping leaves create shaded, humid microenvironments perfect for fungal spores.
What to Do: Implement regular pruning to remove unnecessary leaves, especially those blocking light and airflow to the buds. Thin out the bud sites that are too close together, focusing on creating open spaces where air can flow freely through and around the buds. During early flowering, remove lower branches and leaves that won’t contribute much to yield but hinder circulation. Keep the canopy even and manageable, which also makes it easier to inspect for signs of rot.
6. Use Preventive Fungicides or Organic Sprays
Fungal spores are everywhere, so it’s important to use preventive measures to keep them from settling on your buds in the first place. Organic fungicides can help reduce spore viability and create a protective barrier without harming your plants or your harvest.
What to Do: Start applying organic sprays like neem oil, potassium bicarbonate, or copper-based fungicides during the early flowering phase before any signs of mold appear. Apply these treatments during cooler parts of the day, such as early morning or late afternoon, to avoid leaf burn and ensure sprays dry quickly. Always follow label instructions for dosages and frequency to avoid stressing your plants or disrupting their growth cycle.
7. Harvest on Time
Allowing buds to stay on the plant too long, especially in humid or wet conditions, increases their exposure to mold spores. Overripe buds can become overly dense and trap moisture, making them prime targets for purple bud rot.
What to Do: Monitor your buds closely using a jeweler’s loupe to check trichome development and determine the optimal harvest window. Aim to harvest as soon as most trichomes turn milky white with some amber, signaling peak potency and flavor. If you’re experiencing prolonged humid weather or suspect bud rot, it’s better to harvest slightly earlier than risk losing your entire crop to mold.
With tools like PlanaCan, you can go a step further by tracking and analyzing your harvest data in one place. It lets you generate detailed reports on your cultivation decisions and how they impact yield. Over time, this helps you identify what works, avoid repeating past mistakes, and refine your process for better results in future harvests.
8. Remove and Dispose of Infected Plant Material Immediately
Fungal spores spread easily, so once you detect infected buds, quick and careful removal is essential to stop contamination of healthy parts.
What to Do: Use sterilized scissors or pruning shears to cut away all infected buds or branches. Avoid touching other parts of the plant with the same tools until they are disinfected. Seal infected plant material in plastic bags and dispose of it far away from your grow area — do not compost it as the spores can survive and reinfect. After pruning, clean your tools with isopropyl alcohol or a bleach solution to kill any remaining spores.
9. Maintain Clean Growing Conditions
Fungal spores and pathogens thrive in dirty environments with plant debris and dust, which act as reservoirs for infection.
What to Do: Regularly clean your grow space by sweeping floors, wiping down surfaces, and removing any dead leaves or plant debris. Use a mild bleach or hydrogen peroxide solution to disinfect pots, trays, and tools. If you grow indoors, maintain cleanliness in your ventilation system as well. This ongoing hygiene routine helps minimize the chance of spores settling and infecting your plants.
10. Monitor Weather and Environmental Conditions (For Outdoor Grows)
Outdoor cannabis is vulnerable to environmental fluctuations like rain, fog, and temperature swings that can increase humidity and spread spores.
What to Do: Keep a close eye on your local weather forecasts. If heavy rain or high humidity is predicted during flowering, consider moving plants under temporary covers or into a greenhouse if possible. Use tarps or protective structures to shield your plants from prolonged wet conditions. If unfavorable weather persists and humidity stays high, plan to harvest early rather than risk losing the crop to bud rot.
Now, let us discuss how to prevent purple bud rot in cannabis plants during harvesting and drying below.
Prevention of Cannabis Purple Bud Rot During Harvest and Drying
To protect your buds from this fungal enemy, you need to control the environment and handle your plants correctly at these critical stages. Here’s exactly what you should do to keep bud rot at bay:
- Harvest Smart and Timely: When it comes to harvesting, timing is everything. You want to cut your cannabis plants before the weather gets too humid or cold, because those conditions give bud rot a perfect chance to develop. Monitor your plants closely and try to harvest during a dry spell, ideally in the morning after the dew has dried but before the heat of the day. Avoid harvesting when the buds are wet or damp.
- Handle Buds Gently and Minimize Damage: Treat your plants carefully during harvest. Bruised or crushed buds create entry points for mold spores. Use clean, sharp scissors or pruning shears to cut the branches carefully. Avoid rough handling or piling buds on top of each other, as this traps moisture and encourages fungal growth.
- Remove Excess Leaves Before Drying: Before drying, trim away excess large fan leaves that can trap moisture and block airflow around the buds. This helps reduce humidity around the buds during drying and lowers your risk of bud rot.
- Set Up a Clean, Controlled Drying Environment: Right after harvest, your drying space becomes the frontline defense against bud rot. You must keep this area:
- Dry: Aim for humidity levels between 45% and 55%. Use dehumidifiers if needed.
- Cool: Keep temperatures between 60°F and 70°F (15°C - 21°C).
- Well-ventilated: Good airflow helps moisture evaporate and prevents stagnant, damp air where mold thrives.
Make sure the drying room is clean and free of dust and spores.
- Hang Buds Properly with Enough Space: Hang your branches or buds spaced apart so that air can circulate freely between them. Crowding creates pockets of trapped moisture that invite bud rot. Use drying racks or hangers that maximize airflow around every part of your buds.
- Use Fans Wisely: Place oscillating fans in the drying room to circulate air gently. Avoid blowing air directly onto buds, which can dry them unevenly or cause stress. The goal is consistent, gentle airflow that keeps the environment dry and mold-free.
- Check Your Buds Frequently: Inspect your drying cannabis daily. Look for early signs of bud rot, such as soft spots, dark discoloration, or a musty smell. If you spot any affected buds, remove them immediately to prevent their spread.
To help you improve your post-harvest process over time, PlanaCan lets you generate detailed harvest reports that capture every cultivation decision and its impact on yield. All your data is stored in one place, making it easy to spot patterns, learn what worked, and refine your approach for better results in future growth.
8. Control Drying Time Carefully: Don’t rush the drying process by using high heat, but also don’t let it drag on too long. A slow, steady drying process prevents trapped moisture inside the buds. Depending on your environment, drying typically takes 7-14 days. Aim for buds that snap rather than bend.
Conclusion
Preventing purple bud rot isn’t just about reacting to problems; it’s about staying ahead with careful environmental control. Keeping humidity low, airflow steady, and temperature consistent creates the ideal conditions to stop fungal infections before they even start. And when you do spot any signs of rot, acting fast by pruning affected buds and sanitizing your tools is key to protecting the rest of your crop.
With the right care and attention during harvest and drying, you can safeguard your buds and maintain a healthy, high-quality yield throughout the process. Your hard work deserves nothing less.
To make this process easier and more efficient, PlanaCan is here to help growers like you take control of every step of your cultivation journey. PlanaCan lets you plan, organize, and automate your grow with customizable templates for different strains and harvest cycles, all mapped out in a clear, interactive calendar.
From scheduling daily tasks to tracking environmental conditions, PlanaCan keeps you on top of humidity levels, airflow, and temperature control so you can prevent problems before they arise. Plus, everyone on your team stays connected, ensuring nothing gets missed and your workflow stays smooth.
If you want to grow cleaner, healthier cannabis with less guesswork and more confidence, PlanaCan is the tool that supports your success every step of the way.
Schedule a free call today and see how PlanaCan can help you protect your crop and maximize your harvest.


