By week 4 of the flowering stage, your cannabis plant is no longer just showing potential; it’s entering a crucial stage of the growth cycle. This is the midpoint of bloom, where the early stretching stops and the real bud development begins.
At this stage, the plant shifts its energy away from vertical growth and focuses on flower formation. If you’ve handled the vegetative phase and early flowering correctly, week 4 is where you’ll start to see the payoff, but only if you continue to stay attentive.
This week is not about sitting back and waiting for magic to happen. It’s about precision. Trichomes may be starting to appear, but that doesn’t guarantee quality. Your plants need consistent light, proper nutrients, environmental stability, and physical support. Any oversight can compromise bud density, potency, or health.
Let’s walk through why this week matters and what you should focus on.
What Is the Cannabis Flowering Week 4?
Week 4 of the cannabis flowering stage marks a key transition point where your plants shift from early bud development into the heart of flower production. By now, your grow has stabilized after the stretch, and the light cycle, 12 hours of light followed by 12 hours of darkness, has fully signaled to the plant that it’s time to flower in earnest. This phase demands your full attention as the foundation for quality, potency, and yield is laid during these days.
But first, let us do a recap of what you should accomplish by the time you reach week 4 of cannabis flowering.
Week 4 Recap: What Should Be Done by Now
By Week 4, you should have completed the following key steps:
- Defoliation: Initial defoliation should be done to improve airflow and light penetration.
- Low-Stress Training (LST) or Topping: Early LST or topping should already be applied to shape the plant and encourage multiple colas.
- Nutrient Switch: The transition from vegetative to bloom/flowering nutrients should have started by Week 3.
- Plant Health Check: Ensure no major pests, diseases, or nutrient deficiencies are present.
- Growth Monitoring: Plants should be showing steady growth and developing strong structural support.
If you’re behind on any of these, now’s the time to catch up to stay on track for a healthy flowering phase.
Why Is Week 4 So Important for Your Cannabis Cultivation?
Week 4 marks a crucial turning point in your cannabis grow. What happens during this stage directly influences the health, size, and quality of your final harvest. Here’s why you need to pay special attention now:
- Build the Plant’s Structural Foundation: By Week 4, your plants transition from fragile seedlings to sturdy young plants. This phase determines the shape, strength, and size of your plants. What you do now, like training or pruning, sets the framework that supports heavy buds later. Miss this window, and you risk weak branches and smaller yields.
- Maximize Future Yield Potential: Your plants grow vigorously in Week 4. Healthy leaves and stems mean the plant can support bigger, denser flowers down the line. Neglect at this stage reduces your crop’s potential size and potency.
- Support Peak Nutrient Uptake: Your plants’ nutrient demands surge now, especially nitrogen for leaf and stem growth. Providing the right nutrition fuels strong development. If you fall short, growth slows, and your plants can’t reach their full potential.
- Strengthen the Root System: By Week 4, roots grow rapidly, expanding the plant’s ability to absorb water and nutrients. A strong root system supports vigorous growth and resilience. Neglecting root health limits the plant’s capacity and slows progress.
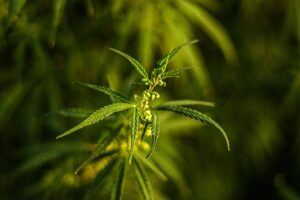
- Identify Plant Sex and Manage Health Early: Pre-flowers often appear around Week 4. This is your chance to identify and remove males to prevent unwanted pollination. You also catch early signs of pests or nutrient deficiencies when treatment is easiest and most effective.
- Optimize Environmental Conditions: As plants grow larger, they become more sensitive to temperature, humidity, airflow, and lighting. Properly controlling these factors now prevents stress, mold, and disease that could severely damage your crop later.
- Prepare Plants for the Transition to Flowering: This week is your last chance to optimize vegetative growth before switching the light cycle to induce flowering. The size and health of your plants at this point determine how well they handle flowering stress and bud production.
- Enhance Pest and Disease Resistance: Healthy, well-cared-for plants in Week 4 build natural defenses. Consistent nutrition, airflow, and cleanliness now reduce the risk of infestations or diseases that can devastate your crop during flowering.
- Build Momentum for Consistent Harvests: Paying close attention during Week 4 sets a strong foundation for future growth. This phase teaches you key care habits that always lead to reliable, high-quality harvests. Skipping or rushing Week 4 risks uneven or disappointing results.
So, what changes occur during week 4 of cannabis flowering? Let us understand below.
What Changes Occur to Your Cannabis Plant at Week 4?
By the time your cannabis plant reaches week 4, it enters a critical phase of growth. Here’s what you can expect and what you should watch for:
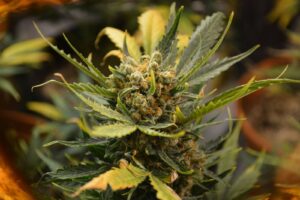
1. Buds Become More Developed and Dense
During week 4 of flowering, your cannabis buds begin to swell and become visibly denser. This happens because the plant shifts energy from producing leaves to focusing on flower development. Trichomes, the tiny resin glands that contain cannabinoids like THC and CBD, increase dramatically, covering the buds with a sticky, shiny coating. This resin is critical as it contains the potency, aroma, and flavor compounds.
What can you do:
- Support the buds: Because buds grow heavier and denser, branches may struggle to support their weight. Use stakes, trellis nets, or plant ties to prevent breakage or bending.
- Maintain optimal lighting: Ensure your light source is strong and consistent, as sufficient light intensity encourages maximum resin production and denser buds.
- Monitor humidity: Dense buds trap moisture, increasing the risk of mold. Proper ventilation will keep humidity in check and protect your crop.
With PlanaCan, you can track each harvest and the choices you make along the way, like lighting, nutrients, and timing. It pulls everything into one place so you can spot what’s working, avoid what’s not, and keep improving your growth with every cycle.
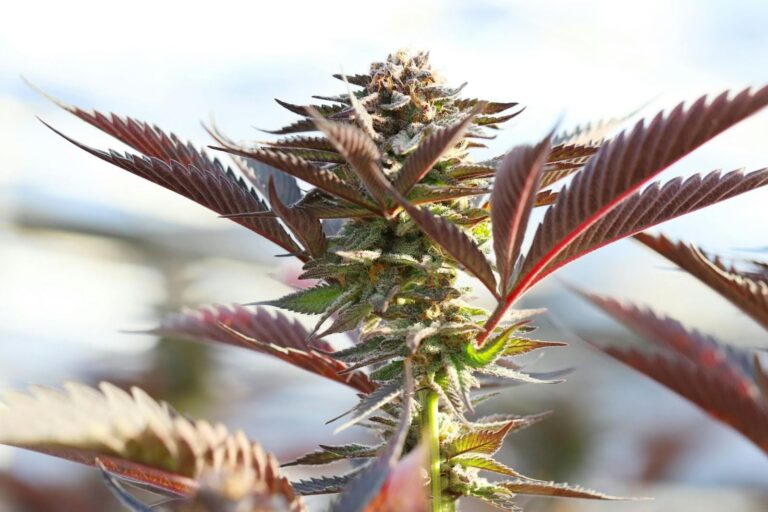
2. Pistils Darken and Curl
The pistils, which initially appear as white, hair-like structures protruding from the buds, start to change color around this time. They darken to hues of amber, red, or brown and curl inward toward the bud. This natural progression signals the maturation process of the flowers and is one of the visual cues growers use to estimate the ideal harvest time. Early or stressed pistil darkening can negatively affect bud quality.
What can you do:
- Track pistil color: Regularly observe the pistils to time your harvest accurately. A majority of darkened pistils typically indicates peak potency.
- Avoid plant stress: Factors like sudden light changes, temperature swings, or nutrient imbalances can cause pistils to darken prematurely, reducing overall quality.
- Maintain stable environmental conditions: Consistency in temperature, humidity, and light cycles helps pistils mature naturally and evenly.
3. Increased Nutrient Demand for Flowering
At this stage, your plant’s nutrient requirements shift dramatically. While nitrogen was important during the vegetative stage to support leafy growth, flowering cannabis now demands higher phosphorus and potassium levels. Phosphorus supports bud development and energy transfer within the plant, while potassium aids in overall flower health and resin production. Too much nitrogen during flowering can actually inhibit bud growth and cause leafy, less potent flowers.
What can you do:
- Adjust feeding regimen: Switch to fertilizers formulated specifically for flowering that have increased phosphorus and potassium content.
- Watch for deficiency signs: Look for symptoms such as yellowing leaves, brown spots, or curling around the buds, indicating phosphorus or potassium shortages.
- Avoid nitrogen overdose: Reduce nitrogen levels in your nutrient mix to prevent excessive leaf growth that detracts from bud development.
4. Height Growth Slows Down
Unlike the rapid stretching phase early in flowering, by week 4, vertical growth slows considerably. The plant reallocates energy from elongating stems to focusing on swelling and ripening buds. This means you will notice less upward growth and more bud expansion and density.
What can you do:
- Focus on bud support: Because vertical growth slows but buds get heavier, ensure branches are adequately supported with stakes or ties.
- Use training techniques: If you want to maximize light penetration and airflow, apply gentle training methods like Low-Stress Training (LST) to spread branches and create an even canopy.
- Adjust lighting height: Since your plants stop stretching upward, lower or raise grow lights accordingly to maintain optimal light intensity without causing heat stress.
5. Higher Risk of Mold and Mildew
Dense buds combined with elevated humidity levels create ideal conditions for mold and powdery mildew to develop. Mold can quickly ruin your crop by damaging the buds, reducing potency, and making the product unsafe to consume. Moisture trapped inside thick bud clusters is the primary culprit.
What can you do:
- Maintain humidity between 40-50%: Use dehumidifiers and ventilation systems to keep moisture levels low during flowering.
- Improve airflow: Use oscillating fans to circulate air gently around the buds, reducing stagnant pockets of humid air.
- Remove dead or yellow leaves: These leaves can hold moisture and harbor mold spores, so timely pruning helps reduce mold risk.
- Inspect buds regularly: Look closely for signs of mold, such as powdery or fuzzy white patches, and immediately act if found.
6. Pest Activity May Increase
As buds mature and become stickier with resin, they become more attractive to pests like spider mites, aphids, and whiteflies. These pests feed on the plant’s sap or damage the buds directly, lowering yield and quality. Infestations can spread rapidly and go unnoticed without careful inspection.
What can you do:
- Schedule frequent inspections: Check your plants daily, focusing on the undersides of leaves and bud sites for tiny insects or eggs.
- Apply organic pest control: Use neem oil, insecticidal soap, or other plant-safe treatments to manage pests without harming the plant or your final product.
- Maintain cleanliness: Regularly remove fallen leaves and debris, and sanitize tools to prevent pest habitats and cross-contamination.
7. Resin Production Peaks
The trichomes on your buds produce maximum amounts of resin during this phase. This sticky resin contains the highest concentrations of cannabinoids (like THC and CBD) and terpenes, which determine the aroma, flavor, and effect of your cannabis.
What can you do:
- Protect your trichomes: Avoid excessive handling or rough pruning of buds, as physical damage can reduce resin quality.
- Optimize environment: Maintain strong but controlled light intensity and stable temperatures to preserve resin integrity.
- Monitor trichome color: Use a magnifier to check if trichomes are clear, milky, or amber. Harvesting at the right stage influences potency and effect.
8. Watch for Nutrient Deficiencies
Deficiencies in key nutrients like phosphorus or potassium can cause serious problems during flowering. Symptoms include yellowing or browning of leaves near the buds, leaf curling, and overall stunted bud growth. Nutrient deficiencies slow down flower maturation and can lower potency.
What can you do:
- Inspect leaves carefully: Focus on discoloration or deformation on leaves closest to the buds, as these usually show early signs of deficiency.
- Adjust your nutrient mix: Increase phosphorus and potassium levels as soon as you notice symptoms to help your plant recover quickly.
- Check pH levels: Nutrient uptake depends on proper pH balance (typically 6.0–6.5 for soil); incorrect pH can cause nutrient lockout even if nutrients are present.
Now, let us understand the factors that affect week 4 of cannabis flowering.
Factors Affecting Week 4 Cannabis Flowering
At week 4 of flowering, your cannabis plants are in a crucial stage of bud development. This is when resin production begins ramping up and flowers gain mass. Managing the right environmental and nutritional factors now directly impacts your final yield and quality.
- Light Intensity and Spectrum: You need to provide strong, consistent light to fuel flower production. By this point, your plants have stopped stretching and are focusing energy on bud growth. Red-dominant light in the 620–780 nm range encourages better flower formation. If the lights are too dim or too far from the canopy, your buds won’t develop to their full potential.
Tip: Keep your lights 12–18 inches from the canopy (depending on type) and consider adding supplemental red-spectrum LEDs if you’re using full-spectrum lights.
- Nutrient Balance: Your plants require less nitrogen now and more phosphorus and potassium to support healthy bud formation. A bloom-specific formula tailored to week 4 flowering delivers what your plant needs without overfeeding. Too much nitrogen at this stage can delay flowering and cause leafy buds, while deficiencies in phosphorus or potassium can cause weak, airy flowers.
Tip: Use a bloom nutrient with an N-P-K ratio like 1-3-2 or 0-10-10, and flush with clean water if you notice signs of nutrient burn like leaf tip browning.
- Temperature: Maintaining the right temperature range supports healthy metabolic activity and resin production. Keep temperatures between 70–80°F (21–27°C) during the day, with a drop of no more than 10°F (5°C) at night. Extreme heat can reduce potency, while cold can slow bud development.
Tip: Monitor fluctuations using a digital thermometer with a max/min reading. If you’re growing indoors, position fans or air conditioning to stabilize the environment.
- Humidity: High humidity at this stage increases the risk of mold and bud rot, especially as flowers begin to thicken. Keep the relative humidity around 40–50% to protect developing buds and encourage trichome production. Too low, however, and your plants may become overly dry and stressed.
Tip: Use a dehumidifier during lights-off periods and space out plants to promote better airflow between colas.
- Airflow: By week 4, your canopy becomes denser, making it harder for air to circulate. Without proper airflow, you risk mold buildup and weak stems. Constant gentle air movement strengthens the plant structure and keeps conditions stable.
Tip: Use oscillating fans to move air above and below the canopy, and clean intake/exhaust filters weekly to maintain efficiency.
- CO₂ Levels: Supplemental CO₂ can enhance flowering, but only when paired with high light intensity and proper nutrients. When done correctly, elevated CO₂ increases photosynthesis, which translates to heavier yields. If light levels are low, CO₂ won’t provide any real benefit.
Tip: If supplementing, aim for CO₂ levels around 1,000–1,200 ppm and only enrich during the light cycle. Ensure your space is sealed well to retain CO₂.
- Watering and pH: Watering needs can change during flowering. The root zone must stay moist but not waterlogged. Overwatering leads to root rot, while underwatering causes stress that affects bud development. Also, the wrong pH can lock out key nutrients your plants need.
Tip: Use a soil moisture meter to avoid guesswork and check pH runoff regularly to ensure it’s within 6.0–6.5. Adjust using pH up/down solutions as needed.
- Genetics: Your plant’s genetics determine how it responds to these conditions. Indica-dominant strains tend to develop faster and may start stacking buds earlier. Sativas can take longer and may require a longer flowering phase. Understanding the genetic traits allows you to tailor your care accordingly.
Tip: Keep a grow journal that includes strain-specific notes on flowering time, bud development, and how each plant responds to environmental tweaks.
PlanaCan makes it easy to turn those notes into detailed harvest reports showing how your decisions affect the final yield. Every insight is stored in one place, so you can quickly spot what is working and what is not. Over time, these insights help you dial in your process, avoid repeat mistakes, and grow bigger, better harvests with less guesswork.
Week 4 Feeding Troubleshooting Table
By Week 4, your plants are hitting a crucial growth stage, and nutrient imbalances can show fast. This table helps you quickly identify symptoms, such as yellowing leaves, burnt tips, or slow growth, and pinpoint what’s causing them.
Problem | Signs | Solution |
Nitrogen Deficiency | Yellowing lower leaves, slow vertical growth | Slightly increase base bloom nutrients (not veg nutrients) |
Phosphorus Deficiency | Purple stems, dark/bluish leaves, small bud sites | Add bloom booster with higher P (e.g., 1-3-2 ratio) |
Potassium Deficiency | Leaf edges yellow or brown, weak stems, poor bud formation | Increase potassium-rich bloom nutrients (e.g., 0-3-5 ratio) |
Nutrient Burn | Leaf tips turning brown, edges curling, dark green foliage | Flush with plain water, reduce nutrient strength by 25–50% |
Calcium Deficiency | Rust spots on leaves, weak stems, bud deformities | Add Cal-Mag supplement or switch to a bloom base that includes calcium |
pH Imbalance | Nutrient lockout despite feeding, leaf discoloration, slow growth | Check runoff pH (aim for 6.0–6.5 in soil, 5.8–6.2 in coco/hydro), adjust as needed |
Expectations for Week 5
As you move into week 5, buds should start stacking more aggressively. Depending on the strain, you’ll see more trichomes forming, and pistils may begin to darken slightly.
This is not the time to experiment. Keep everything consistent, light schedules, nutrients, and airflow, and monitor closely. If you’ve done the work in week 4, week 5 becomes about maintaining momentum, not fixing problems.
Conclusion
Week 4 marks a turning point in cannabis cultivation. Buds are forming, trichomes are emerging, and your plants begin shifting from vegetative growth to full flower production. This phase sets the foundation for your harvest’s yield, potency, and flavor, making precision essential.
With so much riding on this week, staying organized is key. That’s where PlanaCan comes in. The platform helps growers manage multiple strains, adjust nutrient schedules, and monitor plant health, all in one place. Features like timeline tracking, environmental monitoring, and real-time alerts ensure you stay on top of every critical detail.
Ready to streamline your grow and maximize results? Schedule a free call today to see how PlanaCan can help you stay focused and deliver a high-quality harvest.