Every grower has the same burning question at the start of their journey: how long does it take a weed seed to grow? The answer depends on various factors, including strain, growing methods, and environmental conditions.
Cultivating cannabis is as much an art as it is a science. It demands patience, attention to detail, and a deep understanding of your plants. From choosing the right strain to creating the ideal environment, every decision you make influences the quality and quantity of your final yield. This journey begins the moment your seed cracks open, marking the start of the germination process.
Understanding each stage of the cannabis lifecycle, from the first crack of the seed to the final, sticky harvest, is the first step toward a successful yield. Knowing what to expect at each phase can make all the difference, whether you plan to grow a single plant or manage a large operation. Let’s break it down, phase by phase, so you know exactly what to expect.
What Is Germination?
Germination is the critical first stage of a plant’s life cycle, where a dormant seed transforms into a living, growing seedling. This process begins when the seed absorbs water, activating its internal enzymes and breaking its dormancy. The seed coat, or testa, softens and eventually cracks open, allowing the first root, known as the radicle, to emerge. This tiny root anchors the seedling to the soil, stabilizing it and serving as the primary water and nutrient uptake channel.
Shortly after the radicle appears, the plumule (the embryonic shoot) starts pushing upward, breaking through the soil’s surface. This marks the seedling’s first contact with light, triggering photosynthesis and rapid growth. The emerging shoot unfolds its first leaves, known as cotyledons, which provide the young plant with the initial energy until true leaves form and the root system fully develops.
Not all seeds germinate at the same rate. Several factors influence the speed and success of this process, including:
- Genetics and Seed Quality: Some strains naturally germinate faster, while others are slower by design. High-quality, mature seeds with intact embryos tend to have higher germination rates. Poor-quality or old seeds, on the other hand, may struggle or fail to germinate altogether.
- Temperature: Most seeds germinate best within a specific temperature range. Extreme temperatures can disrupt enzyme activity, slowing or even halting germination.
- Moisture and Humidity: Seeds need consistent moisture to soften their outer shell and kickstart the metabolic processes required for growth. However, overwatering can suffocate the seed or encourage mold and rot.
- Light Conditions: Some seeds require light to germinate, while others need complete darkness. The right balance depends on the species and strain.
- Oxygen Supply: Seeds also need a steady oxygen supply for respiration. Compacted or waterlogged soil can limit oxygen availability, hindering germination.
- pH Levels: The acidity or alkalinity of the growing medium can impact nutrient availability and seed enzyme activity. Most seeds prefer a slightly acidic to neutral pH.
- Seed Dormancy and Scarification: Some seeds have built-in dormancy mechanisms that prevent immediate germination. This can be overcome with scarification (scratching the seed coat) or stratification (cold exposure) to break dormancy.
- Soil Microbes: Beneficial soil microbes can enhance germination by improving nutrient availability and protecting against pathogens.
- Salt Levels: High salt concentrations can inhibit water uptake and damage seed tissues, reducing germination rates.
- Soil Type and Texture: Seeds in loose, well-draining soil often germinate more easily than those in compact, dense soil, which can restrict root penetration.
Now, let us understand the growth timeline for cannabis seeds from germination to maturity in detail below.
A Growth Timeline For Cannabis Seeds From Germination To Maturity
Growing cannabis from seed to maturity is a rewarding but intricate process that demands careful attention and precise timing. Each stage of growth, from the fragile germination phase to the strong flowering and final harvest, plays a crucial role in determining the quality, yield, and potency of the final product. Understanding the timeline and specific requirements at every step enables you to optimize environmental conditions, nutrient delivery, and care routines, reducing risks and maximizing plant health.
This comprehensive growth timeline briefly breaks down each phase, providing practical insights into what to expect as cannabis seeds transform into mature, resinous plants.
1. Germination Stage (Day 1 to Day 7)
Germination initiates the cannabis life cycle, transforming a dormant seed into a living plant. The process begins once the seed encounters optimal moisture, warmth, and darkness, signaling it’s time to grow. Inside, the embryonic plant absorbs water, activating enzymes that kick-start metabolic processes necessary for growth.
- Days 1-3: The seed absorbs water, causing the hard outer shell (testa) to soften and swell. Enzymes break down stored food in the seed’s endosperm, feeding the embryonic root (radicle) as it prepares to break through the shell. A tiny white root emerges, the first sign of life.
- Days 4-7: The radicle grows downward, anchoring the seedling and absorbing water and nutrients from the medium. Simultaneously, the seed shell cracks open, and the hypocotyl (stem) pushes upward, bringing with it the cotyledons—the seed’s first leaves.
These cotyledons do not resemble mature cannabis leaves but serve to provide initial energy until photosynthesis begins. Once above the surface, the seedling exposes itself to light, which triggers chlorophyll production, essential for future growth.
Environmental Conditions: Maintain 70-85°F (21-29°C) temperature and near 70-90% humidity to prevent desiccation. Darkness or dim light is best since the seedling initially relies on stored nutrients, not photosynthesis.
2. Seedling Stage (Week 1 to Week 3)
Once the seedling breaches the soil surface, it enters a vulnerable but critical phase. The plant’s metabolism shifts toward producing chlorophyll and beginning photosynthesis to manufacture its own food.
- Week 1: The seedling’s stem (hypocotyl) elongates and strengthens. Cotyledons open fully and perform photosynthesis to fuel growth. The first true leaves emerge, starting as simple, smooth-edged blades, typically with one or two small serrations.
- Week 2: True leaves grow larger and develop the classic serrated edges and finger-like projections that define cannabis leaves. The plant’s root system rapidly expands, growing fine root hairs that increase surface area for water and nutrient absorption. Seedlings become more sensitive to environmental stressors such as overwatering, temperature swings, or intense light.
- Week 3: Leaf complexity increases, with leaves developing more “fingers” (usually 3-5). Stems thicken to support upcoming growth. At this stage, seedlings start to respond more strongly to light, increasing chlorophyll production and energy storage.
Environmental Conditions: Provide 18-24 hours of light daily (often using gentle fluorescent or LED grow lights to avoid burning delicate leaves). Maintain temperature at 65-80°F (18-26°C) and humidity around 60-70%. Water sparingly to keep the medium moist, but avoid saturation that causes root rot.
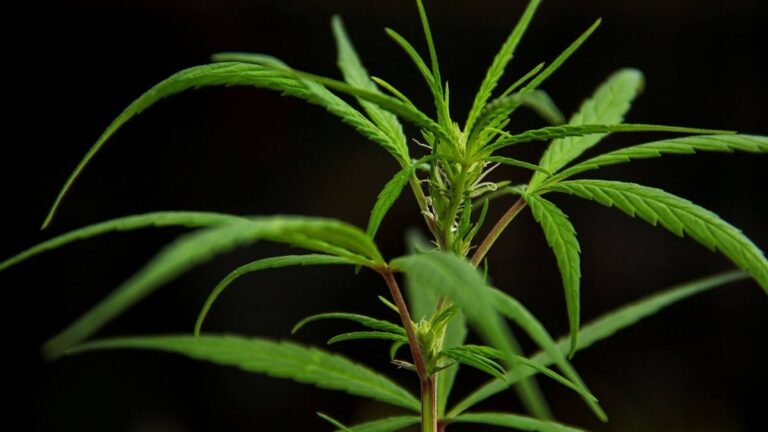
3. Vegetative Stage (Week 3 to Week 8+)
This stage is characterized by vigorous growth in height, leaf count, and root mass. The plant’s primary goal here is to build a strong structure capable of supporting future flowering.
- Weeks 3-4: The cannabis plant begins rapid vertical growth, sometimes increasing its height several inches weekly. Nodes—points where branches and leaves sprout and form along the main stem at regular intervals. Each node produces fan leaves and new side branches, expanding the plant’s canopy and photosynthetic capacity.
- Weeks 5-6: Stems thicken to support heavier growth. Side branches elongate and develop their own nodes. Internodal spacing (distance between nodes) can vary depending on strain and environmental factors like light intensity. Root systems grow deeper and broader, enhancing water and nutrient uptake. The plant’s nitrogen demand rises sharply since nitrogen supports leaf and stem development.
- Weeks 7-8+: The plant often doubles or triples in size compared to the seedling stage. Growers frequently apply training techniques, such as topping, low-stress training (LST), or screen of green (ScrOG, to manage height, promote lateral growth, and maximize light penetration across the canopy.
Environmental Conditions: Provide intense, consistent light for 18-20 hours daily. Temperature should be steady at 70-85°F (21-29°C), with humidity lowered to 40-60% to reduce the risk of mold and encourage transpiration. Nutrients rich in nitrogen and moderate phosphorus and potassium support healthy vegetative growth.
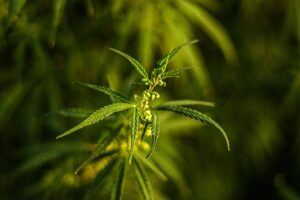
4. Pre-Flowering Stage (Week 7 to Week 9)
This transitional phase signals the plant’s readiness to shift from vegetative growth to reproductive development (flowering). Hormonal changes stimulate sex expression and prepare the plant for bud formation.
- Sex Identification: Early flower sites, called pre-flowers, appear at the nodes. Female pre-flowers show small, white, hair-like pistils; male pre-flowers form small sacs that eventually release pollen. Identifying and removing males at this stage is critical for growers seeking seedless, sensimilla buds (sensimilla buds are cannabis flowers that develop without seeds).
- Stretch Phase: Plants often undergo a growth spurt known as the “stretch,” doubling or even tripling in height within 1-3 weeks after a light cycle change. This rapid elongation allows for greater bud site development.
- Physiological Changes: The plant reallocates energy from leaf and root expansion to floral development, preparing to invest heavily in reproductive structures.
Environmental Conditions: Switch the light cycle to 12 hours of light and 12 hours of complete darkness daily to mimic natural fall daylight, which triggers flowering. Stable temperatures between 65-80°F (18-26°C) and moderate humidity (40-60%) are ideal.
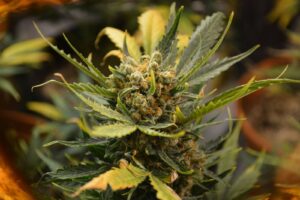
5. Flowering Stage (Week 9 to Week 16)
Flowering is the most crucial phase, where buds develop resin glands packed with cannabinoids (THC, CBD) and terpenes that define aroma and effect.
- Early Flowering (Weeks 1-3 of flowering): Bud sites at nodes swell, and white pistils extend outward. This phase requires careful monitoring of light schedule and nutrients to prevent stress that can stunt bud growth or cause hermaphroditism. Plants continue to stretch vertically but at a slower rate than pre-flowering.
- Mid Flowering (Weeks 4-6): Buds thicken and gain density. Pistils darken and curl inward. Trichomes—tiny, crystal-like glands—form and increase abundance, producing the sticky resin. These trichomes contain the psychoactive and medicinal compounds sought by growers. Nutrient needs shift toward phosphorus and potassium to support flower formation and resin production.
- Late Flowering (Weeks 7-8+): Buds reach peak size and potency. Pistils darken from white to reddish-brown or amber. Trichomes turn milky or amber, signaling peak cannabinoid maturity. At this point, you can begin preparing for harvest by monitoring trichome color under magnification to determine optimal harvest time based on desired effects.
Environmental Conditions: Maintain a strict 12/12 light schedule with uninterrupted darkness to prevent stress. Keep the temperature between 65-80°F (18-26°C), and lower humidity to 40-50% to reduce mold risk, especially in dense buds. Adjust nutrients to bloom formulas high in phosphorus and potassium.
6. Harvest and Drying (Week 16+)
Harvest marks the end of the growth cycle and the start of post-harvest processes essential to quality.
- Harvesting: Timing is critical. Harvest too early, and potency and yield suffer; too late, and THC can degrade into CBN, altering effects. Cut branches or whole plants carefully to preserve buds.
- Drying: Hang trimmed branches upside down in a dark, well-ventilated room with temperatures around 60-70°F (15-21°C) and 50-60% humidity. Slow drying over 7-14 days preserves terpenes and prevents mold. Buds are ready when stems snap cleanly rather than bend.
- Curing: After drying, buds are trimmed and stored in airtight containers, typically glass jars. Regularly opening jars (“burping”) releases moisture and replenishes oxygen, balancing moisture levels to improve flavor, smoothness, and potency. Proper curing can last several weeks to months.
So, what are the techniques for speeding up the germination of cannabis seeds? Let’s discuss them below.
Techniques for Germinating Cannabis Seeds
Germinating seeds effectively is crucial for growers aiming to maximize yields and reduce early-stage losses. Several proven techniques can accelerate this process, improve success rates, and ensure strong, healthy seedlings. Here are some of the most effective methods:
Paper Towel Method
This is one of the simplest and most popular ways to germinate cannabis seeds. It allows you to monitor progress closely and gives your seeds the moisture and warmth they need. Place your seeds between damp paper towels on a plate. Cover them with another plate or plastic wrap to keep the humidity high. Store the setup in a warm, dark spot, ideally between 70-85°F. Check daily and keep the towels moist but not soaked. You’ll see tiny taproots in 2 to 7 days. When the roots reach about half an inch, it’s time to plant.
Direct Soil Planting
Planting seeds directly into soil mimics nature and reduces transplant shock, as roots grow undisturbed in their final home. If you prefer a natural approach, plant your seeds about 1/4 inch deep in light, airy soil. Keep the soil moist but not waterlogged. Using a humidity dome or plastic wrap over your pots helps maintain warmth and moisture, speeding up sprouting. This method minimizes transplant shock since your seedling grows in its final medium.
Starter Plugs or Rapid Rooters
These pre-formed plugs provide an ideal environment for seed germination and root development, especially useful for hydroponics. Use pre-made peat or organic plugs with a hole for your seed. Keep them moist and warm, and the plug offers an ideal environment for root development. Once seedlings have a few leaves, move them to bigger containers or your hydroponic system without disturbing roots.
Water Glass Method
Soaking seeds in water softens their shells, encouraging quicker germination. Soak your seeds in room-temperature water for 12 to 24 hours. This softens the seed shell and jumpstarts germination. Avoid soaking too long; seeds can drown without oxygen. Transfer seeds to soil or paper towels when they sink or crack open.
Rockwool Cubes
Ideal for hydroponic growers, rockwool cubes hold moisture well but require pH balancing. Ideal for hydroponic setups, soak the rockwool cubes in pH-balanced water first. Place seeds in the cube holes and keep the cubes warm and humid. Oversee your pH levels, since rockwool tends to be alkaline.
To help manage this and other factors in your growth, tools like PlanaCan come in handy. They let you track all your cultivation choices and their effects on each harvest in one place. This makes it easier to spot what’s working and what’s not, so you can avoid past mistakes and keep improving your yields and profits over time.
Hydrogen Peroxide Soak
This method disinfects seeds while promoting faster water absorption. Soak your seeds in a diluted hydrogen peroxide solution (about one part 3% H2O2 to four parts water) for 12 to 24 hours. This softens seed shells and disinfects them, reducing mold risk. After soaking, place seeds in your preferred germination medium.
Pre-Scarification
Scarification helps hard or old seeds absorb water more easily. If your seeds are older or hard to crack, lightly nick or sand the seed coat using a fine file or sandpaper. This helps water penetrate faster. Be very gentle to avoid damaging the embryo inside. Then proceed with any germination method.
Cold Stratification
Some seeds benefit from a short cold treatment to mimic natural winter conditions. To mimic natural dormancy, place seeds in a damp paper towel inside a sealed bag and refrigerate at 39-41°F (4-5°C) for 1 to 3 days before germinating. This improves germination rates for some strains of older seeds.
Seedling Heat Mats
Applying gentle bottom heat speeds germination by keeping seeds in their ideal temperature range. Use a seedling heat mat to keep your seeds at a steady 75-85°F during germination. This gentle bottom heat speeds up sprouting and improves success rates, especially in cooler rooms. Combine it with any germination method for best results.
Agar or Gel Medium Germination
For precision growers or breeders, germinating seeds on sterile agar gel plates allows you to control moisture and nutrients perfectly. This method requires a sterile environment and some experience, but can produce uniform, healthy seedlings.
Conclusion
Growing cannabis isn’t just about planting a seed and waiting for results. It’s a process that demands attention at every stage, from germination to harvest. Each phase, from selecting the right seeds to ensuring proper drying and curing, plays a critical role in determining your final yield. Success comes from understanding your plants’ needs, providing the right nutrients, maintaining optimal light and temperature, and staying vigilant for signs of stress or nutrient imbalances.
PlanaCan helps simplify this journey. With customizable templates tailored to specific strains and growth cycles, you can plan each stage of cultivation with precision. From germination schedules to harvest tracking, PlanaCan keeps your workflow organized, reducing the chances of missed steps, nutrient deficiencies, or inconsistent watering.
Its clear, visual timeline allows you to monitor progress, make data-driven decisions, and adjust tasks as needed, ensuring each plant reaches its full potential.
Long-term success in cannabis cultivation isn’t just about working harder; it’s about working smarter. PlanaCan empowers you to stay organized, streamline your operations, and achieve higher yields consistently. Whether you’re managing a large-scale operation or a small personal grow, PlanaCan gives you the tools to maximize your harvest.
Ready to grow smarter? Schedule a free call today to see how PlanaCan can simplify your operation and boost your yields.