Are you staring at your weed plant, wondering if it’s finally ready to harvest? Harvesting your cannabis at the right time can mean the difference between rich, flavorful, potent buds and a yield that falls short of expectations. But figuring out the perfect moment to cut your plants can be a bit challenging.
The good news is your plant gives off plenty of signs when it’s ready—you just need to know what to look for. From the color of the pistils to the state of the trichomes, your plant communicates its readiness in subtle but clear ways.
In this guide, we’ll discuss the essential readiness indicators, from visual cues like pistil color and leaf changes to the more precise science of trichome inspection. We’ll also discuss the tools you need to examine the plant closer, explain how different strains affect timing, and share the best harvesting techniques to maximize yield and potency.
How Do You Identify If Your Cannabis Is Ready To Harvest
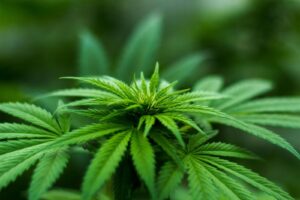
Knowing when your weed plant is ready to harvest starts with observing its physical changes. As your plant progresses through its life cycle, it gives off several visual cues that signal its readiness for harvest. These signs are easy to spot once you know what to look for, and they can significantly affect the potency, flavor, and overall quality of your buds.
Here’s a detailed breakdown of what to look for:
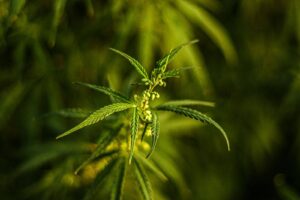
1. Pistils
Pistils are tiny, hair-like structures on the buds that play a key role in the plant’s reproductive process. Their color and shape are strong indicators of your plant’s readiness:
- White and Straight Pistils: Indicate that the plant is still growing.
- Darkening and Curling: As the plant matures, the pistils will darken to orange, red, or brown and begin to curl inward.
- Ideal Harvest Window: When 70 to 90 percent of the pistils have darkened and curled, your plant is approaching its ideal harvest window. This is a general guideline, as some strains may have pistils that remain lighter in color longer.
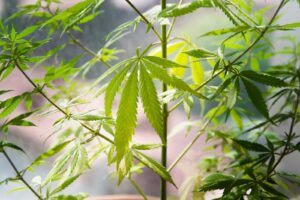
2. Leaves
The leaves of your weed plant also give clues about its maturity:
- Color Changes: As the plant reaches the end of its life cycle, color changes in the leaves are normal. This usually happens because the plant is using up its stored nutrients.
- Yellowing of Fan Leaves: You may notice the fan leaves yellowing, a common sign that the plant is getting close to harvest.
- Purple or Reddish Hues: Some leaves might turn purple or reddish hues depending on the strain. This is especially common in strains with anthocyanin pigments, which react to cooler temperatures and nutrient changes.
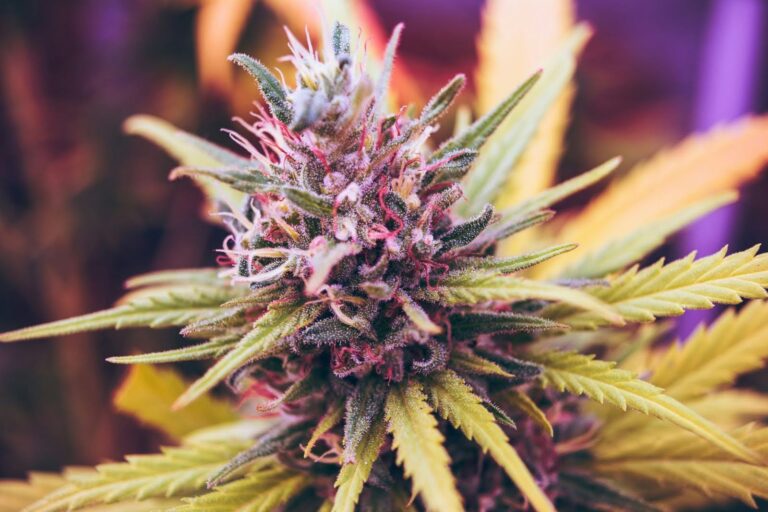
3. Calyxes
The calyxes are the small, tear-shaped parts of the flower that hold the reproductive organs of the plant. They offer important visual cues for harvest readiness:
- Swelling and Plumpness: As the plant matures, the calyxes will swell and become plump.
- Firmness: A mature calyx will feel dense and firm to the touch, contributing to a tight bud structure.
- Signs of Immaturity: If the calyxes are still small or soft, your plant likely needs more time.
4. Bud Density and Shape
The density and structure of your buds are crucial indicators of maturity:
- Firmness: Gently squeeze the buds. Mature buds will feel dense and firm, not light or airy.
- Shape and Structure: Look for rounded, tight bud formations. While sativa strains might have slightly looser buds than Indica strains, they should still feel substantial.
5. Sugar Leaves
Sugar leaves are the small leaves close to the buds and can also provide clues:
- Trichome Coverage: These leaves should be coated in trichomes. If they’re still sparse or mostly clear, it’s a sign the plant needs more time.
- Curling Tips: Slight curling or crisping at the tips of sugar leaves can indicate maturity, especially when combined with other signs.
6. Aroma
The smell of your plant becomes more pronounced as it nears maturity:
- Intense Smell: A mature plant emits a strong, pungent aroma. The scent should be rich and complex, reflecting the strain’s profile.
- Change in Scent: You might notice the aroma shifting from a fresh, grassy smell to a more strong, terpene-rich fragrance. This evolution in scent is a good indicator of readiness.
Combining these observations with trichome inspection ensures you harvest at peak potency and flavor. PlanaCan provides a clear visual timeline for planning and tracking tasks, helping you stay ahead months in advance while managing daily activities. With an adjustable calendar and centralized information, everyone stays on the same page, ensuring no task is overlooked.
Now, let us understand why trichomes are important in harvesting your cannabis. Here’s in detail.
The Importance of Trichomes In Cannabis Harvesting
When harvesting cannabis, trichomes are the most reliable indicator of maturity. While pistil color and leaf changes provide clues, these tiny, crystal-like glands store cannabinoids and terpenes, directly affecting potency, aroma, and flavor.
Monitoring trichome color helps you fine-tune harvest timing for the best quality and effects. Let’s dive deeper into why trichomes are so important and how to use them to perfect your harvest timing.
1. Environmental and Strain Considerations
- Humidity, Light Exposure, and Temperature: Environmental factors like humidity, light exposure, and temperature can slightly affect trichome development. High humidity can hinder trichome production, while optimal light exposure and stable temperatures promote consistent maturation and potency.
- Stable Growing Conditions: Maintaining stable growing conditions helps ensure consistent trichome maturation and potency. Fluctuations in temperature, humidity, or light can result in uneven trichome development, affecting the overall quality of your harvest.
- Strain-Specific Trichome Development: Some strains naturally develop more amber trichomes or maintain clear trichomes longer due to their genetic makeup.
2. Trichome Color Stages and Their Meaning
1. Clear Trichomes:
When trichomes are clear and glass-like, the plant is still in its growth phase.
- Effect: Harvesting at this stage produces weak potency with a more heady, jittery high. It’s generally not recommended.
Why It’s Important: Identifying clear trichomes helps you avoid premature harvesting, ensuring your buds reach their full potential in potency and flavor.
2. Milky or Cloudy Trichomes:
As the plant matures, trichomes turn milky or cloudy, resembling frosted glass.
- Effect: This is the sweet spot for harvesting. Milky trichomes signify peak THC levels, providing a strong, euphoric high. Harvesting during this stage delivers the most potent and psychoactive effects.
Why It’s Important: Recognizing this stage allows you to harvest when THC content is at its highest, giving you the most potent and energetic high.
3. Amber Trichomes:
If you wait a bit longer, trichomes will shift to an amber or golden hue.
- Effect: Amber trichomes indicate that THC is degrading into CBN, a cannabinoid with more sedative and relaxing properties. Buds harvested at this stage offer a calmer, body-heavy high, often preferred for evening or medicinal purposes.
Why It’s Important: Understanding when trichomes turn amber helps you tailor your harvest for a more relaxing and sedative effect, ideal for nighttime or medicinal use.
4. Mixed Trichomes: The Ideal Balance:
When you notice a mix of milky and amber trichomes, you’ve likely hit the sweet spot. This combination indicates that the plant has both peak THC levels and a slight conversion to CBN.
- Effect: Harvesting at this stage provides a balanced high—an uplifting, cerebral effect from the milky trichomes with a relaxing, body-calming sensation from the amber ones. Many growers prefer this stage for a more rounded cannabis experience.
Why It’s Important: Spotting a mix of trichome colors allows you to achieve a versatile, well-rounded high, making it suitable for various occasions and preferences.
5. Overripe Trichomes:
Trichomes that turn dark brown or begin to degrade indicate the plant is overripe.
- Effect: Overripe trichomes can produce a harsh smoke with diminished potency and flavor. The high may feel overly sedative or dull. Harvesting before this stage is best unless you’re targeting specific effects, like extreme sedation.
- Why It’s Important: Recognizing overripe trichomes prevents you from harvesting too late, avoiding a harsh, less enjoyable smoke with reduced potency.
So, how do you monitor trichomes in your cannabis plant, and what tools do you use in the process of harvest? Let us find out in detail.
Tools for Monitoring Trichomes In Cannabis
To gauge your cannabis’s readiness, inspect the trichomes—tiny glands that determine potency and flavor. Their subtle color shifts require magnification to distinguish clear, milky, and amber stages. The right tools help you pinpoint the ideal harvest window for maximum THC, desired effects, and rich flavor. Here are some essentials:
1. Jeweler’s Loupe:
This portable magnifier offers 30x to 60x magnification, perfect for quick inspections. It’s affordable and popular among growers but requires a steady hand and good lighting.
How to Use: Hold the loupe close to your eye and bring the bud towards it until trichomes are in focus. Use bright light for clarity.
2. Strong Magnifying Glass:
With at least 10x magnification, this tool is great for beginners who need a simple check. However, it may struggle with fine details.
How to Use: Hold a few inches from the bud and adjust the distance until the trichomes are sharp. Bright light improves visibility.
3. USB Microscope:
It connects to your computer or phone, offering up to 200x magnification. This is ideal for detailed trichome inspection and documenting growth.
How to Use: Connect to your device, place the lens near the bud, and adjust focus and lighting until the trichomes are visible. Capture images if needed.
4. Digital Microscopes:
These advanced tools have built-in screens, offering high magnification without extra devices. Great for professional growers.
How to Use: Position over the bud, adjust focus and brightness, and inspect trichomes in real-time. Use capture features to document.
5. Smartphone Macro Lenses:
Clip-on lenses that turn your phone into a magnifier. Convenient for quick photos, though magnification is less than microscopes.
How to Use: Attach to your camera, bring the phone close to the bud, and adjust until the trichomes are clear. Use zoom if needed.
6. Headband Magnifiers:
Hands-free magnification is useful for inspecting multiple plants. Comfortable for extended use.
How to Use: Wear like a headband, adjust lens distance, and position the bud in your view. Move your head or plant to focus.
Having the right tools ensures you harvest cannabis at peak potency and flavor. PlanaCan’s visual timeline helps plan and track every stage, from long-term scheduling to daily tasks. Its centralized calendar keeps workflows adaptable and ensures nothing is overlooked for a smooth, efficient harvest.
Now, let us discuss some considerations while determining the harvest timing for your cannabis.
Considerations for Cannabis Harvest Timing
Harvest timing varies based on several factors, including cannabis strain, environmental conditions, and desired effects. Indica strains typically mature faster than sativas, with hybrids falling in between.
Balancing these variables below ensures maximum potency, flavor, and desired effects:
1. Strain Differences
- Indicas vs. Sativas: Indicas mature faster, typically within 8-10 weeks of flowering, while sativas can take 10-12 weeks or longer. Knowing your strain’s timeline helps prevent premature harvesting.
- Hybrids: Maturation varies based on genetics—sativa-dominant hybrids take longer, while indica-dominant hybrids mature faster.
2. Trichome Color Guide
Harvest when 20-30% of trichomes turn amber for a balanced effect. More milky trichomes provide an energetic high, while more amber trichomes create a deeply relaxing effect.
3. Environmental Factors
- Light Exposure: Consistent lighting speeds up maturation, while poor lighting delays it.
- Temperature & Humidity: High temps degrade trichomes; stable, cooler conditions preserve potency. Fluctuating humidity can cause mold.
- Air Circulation: Good airflow prevents mold and pests, promoting healthy growth.
- Nutrient Levels: Overfeeding can stress plants; flushing excess nutrients before harvest improves flavor.
Is your environment helping or hurting your harvest? PlanaCan removes the guesswork by tracking soil and harvest data, allowing you to refine methods for bigger yields and better profits.
4. Risks of Early & Late Harvesting
- Too Early: Weaker buds, reduced potency, and harsh smoke due to underdeveloped cannabinoids and terpenes.
- Too Late: THC degrades into CBN, creating a sedative effect—ideal for some but may dull the high for others.
Now, let us understand some of the cannabis harvesting techniques that you can use for your cannabis plants.
Cannabis Harvesting Techniques
When you’re ready to harvest, begin with the topmost buds, also known as colas. These buds receive the most light and generally mature faster than those lower on the plant. Carefully cutting these first allows the lower buds more time to develop, ensuring that every part of the plant reaches its full potential. This strategy helps maximize yield and ensures consistent quality across your harvest. Let us look at the techniques in detail:
1. Stage Harvesting
Consider using stage harvesting, where you harvest your plant in phases instead of all at once. This technique involves:
- First Harvest: Cut the mature top buds when they are dense and sticky and show a high percentage of amber or milky trichomes.
- Second Harvest: After removing the top buds, allow the lower buds to receive more light and airflow. This will encourage further development over a few additional days.
- Final Harvest: You can complete the final harvest once the lower buds have matured, exhibiting dense structures and optimal trichome coloration.
2. Tools for Efficient Harvesting
Using the right tools ensures a clean cut and reduces damage to the plant:
- Sharp Pruning Shears: Use sterilized, sharp shears for precise cuts. This reduces plant stress and prevents damage that can lead to mold or infection.
- Trimming Scissors: For detailed work on smaller buds, trimming scissors are ideal for removing excess leaves and fine-tuning bud structure.
- Gloves: Gloves help keep hands clean and prevent trichomes from sticking to the skin, preserving the valuable resin for the final product.
- Harvest Tray or Table: Use a clean, flat surface to collect and organize your buds during trimming. This helps maintain order and reduces the risk of contamination.
3. Drying and Curing Post-Harvest
After harvesting, it’s essential to dry and cure your buds properly to maintain potency and flavor.
- Drying: Hang the buds upside down in a cool, dark place with good airflow for 7-14 days. Ensure the temperature stays between 60-70°F and humidity is around 50-60% to prevent mold and allow for a slow, even dry.
- Curing: Once dried, proceed to curing by placing the buds in airtight containers like glass jars. For the first couple of weeks, open the jars daily to release excess moisture (a process called “burping”). This step helps enhance flavor and aroma and ensures a smooth smoke. For the best results, continue curing for at least 2-4 weeks.
Conclusion
Harvesting your weed at the right time is all about careful observation. By monitoring pistils, trichomes, and bud structure, you can pinpoint the perfect moment to harvest, ensuring potent, flavorful buds tailored to your desired effects. Understanding your strain’s unique growth patterns and environmental needs is key to maximizing yield and quality.
If you want to streamline and enhance your cultivation process, PlanaCan offers invaluable tools to help you manage your crops efficiently. It enables you to define and automate tasks from planting to harvest using customizable templates, ensuring consistency and efficiency across different strains and harvest cycles.
It also provides a clear visual timeline for day-to-day activities and long-term planning. This centralized system makes it easy to adjust to the dynamic needs of your growth operation and ensures no task is overlooked, helping you maintain a streamlined and effective workflow.
With PlanaCan’s smart cultivation tools, you can optimize your workflow, reduce manual errors, and focus more on what matters most—growing high-quality cannabis.
Schedule a free call today to see how PlanaCan can help you maximize your yields and take your cannabis cultivation to the next level.