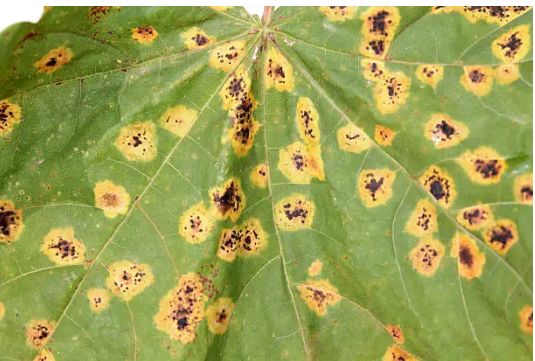
Have you ever seen brown spots on your cannabis leaves and wondered what they might mean? Such blemishes are more than just a pretty shade. They are often a distress signal from your plant regarding issues that need urgent attention underground.
Brown spot conditions can occur due to nutrient deficiencies, pest attacks, or stress factors. If those reasons are not addressed in time, it can significantly affect your plant’s growth and productivity.
Knowing the causes of those brown spots goes beyond improving your plant’s appearance; it protects its health and ensures that all that effort will be rewarded with a healthy crop. Whether you’re a seasoned grower or just starting, learning how to identify, address, and prevent these issues is essential.
This guide will examine these spots more closely, explore their root causes, and provide actionable solutions to protect your plants and optimize your yield.
Understanding Brown Spots on Cannabis Leaves
Brown spots on the weed leaves can be one of the most prevalent issues home growers face, sparking concern about the health and fitness of their plants.
Cosmetic imperfections aside, brown spots should be considered an alarm signal that something is wrong with your growing environment. Brown spots are only a symptom of nutritional, pest, or environmental problems.
Identifying and diagnosing the root cause of these spots can make the difference between a thriving plant and one that struggles to survive. Factors such as improper pH levels, insufficient calcium, or poor airflow could trigger this response. Let’s examine this in detail.
Potential Causes of Brown Spots In Cannabis
There are several reasons why your cannabis plant might develop brown spots on its leaves. Knowing the causes is the first step to regaining your plant’s health. Here are some of them:
1. Low pH Levels
If the pH of the soil or water is not well managed, it will cause problems with nutrient uptake, resulting in deficiencies and spotting on the leaves.
2. Light Burn
Overexposure to high-intensity grow lights can burn the leaves, leaving them with brown, crispy edges and spots.
3. Heat Stress and Poor Air Circulation
High temperatures and stagnant air may cause spots and weakened foliage in your plant.
4. Watering Problems
Overwatering chokes the roots, while underwatering deprives the roots of moisture, leading to brown spots.
5. Calcium Deficiency
Lack of calcium, caused by incorrect pH levels or mineral-poor water, can lead to spots and weakened plant structure.
6. Root Health Issues
Root rot and similar problems can manifest as brown spots on leaves, indicating that the roots are failing.
7. Pests
Physical injuries to leaves leave noticeable spots and holes caused by the thrips and fungus gnats.
Struggling with cannabis cultivation issues like brown spots, root rot, or pest infestations? PlanaCan’s interactive calendar makes it easy to plan your cannabis yields months ahead, manage daily tasks, and track treatments—all in one place.
Whether addressing pest control or improving root health, PlanaCan organizes your cultivation schedule and ensures no task is overlooked, ensuring your crops stay healthy and thriving.
Now that we know the potential causes of brown spots in cannabis let us examine its symptoms and learn how to diagnose them.
Symptoms and Diagnostic Techniques
To treat brown spots, you must first identify their symptoms. Observe the affected plants closely and systematically analyze the possible causes. The following are the major diagnostic steps to help identify the problem:
1. Spot Patterns
Examine the size, shape, and distribution of the brown spots. Spots that appear randomly scattered usually indicate pest infestation because insects feed irregularly.
On the other hand, uniform spots or discoloration patterns may indicate nutrient deficiencies or environmental imbalances.
2. Other Health Indicators
Observe the general condition of your plant. Check if other symptoms include yellowing leaves, wilting, curling, or discoloration on new and older growth. This is usually common with spotting, which can indicate a cause or source.
3. Testing Soil and Nutrients
Determine the soil and water tests for pH level and nutrient content. Any imbalance can make it difficult for your plant to absorb necessary nutrients.
4. Environmental Evaluation
Evaluate key environmental factors such as light intensity, temperature, humidity, and airflow. Look for imbalances, such as too-intense grow lights or a lack of ventilation, which can intensify plant stress and contribute to spotting.
Verify that all equipment and settings meet optimal cannabis growing conditions. This holistic solution addresses the current problem and helps prevent it from happening again so that your plants are healthier and more robust in the growing environment.
Want to monitor your cannabis yield in real-time? With PlanaCan, you can track every harvest while optimizing key factors such as light, temperature, humidity, and airflow. Detect imbalances, refine processes, and ensure optimal growing conditions—all to increase yields and profits.
So, how do you tackle brown spots in your cannabis plant? Let us understand.
Addressing Brown Spots Caused by Nutrient Deficiencies
If brown spots are due to nutrient imbalances, you can take these steps to help restore a plant’s health and prevent further damage.
1. Correct Nutrient Balance
Ensure the plant receives the proper mix of macronutrients (NPK) and micronutrients, such as calcium and magnesium. Consider investing in the highest-quality fertilizers and supplements designed for cannabis plant growth.
Pro Tip: Utilize a nutrient chart to track and adjust feeding schedules based on development.
2. Adjust Soil pH
To enhance nutrient uptake, check and maintain the pH within the optimal range of 6.0–7.0 for soil and 5.5–6.5 for hydroponics—balance imbalances with pH-up or pH-down solutions as necessary.
Pro Tip: Use pH testing kits or digital meters to check soil or water pH levels frequently.
3. Avoid Over-Fertilization
Overfeeding can be worse than underfeeding. Follow the recommended feeding schedule to prevent a nutrient lockout. If you suspect the soil is over-fertilized, flush your plants in pH-balanced water to remove salts and restore balance.
Pro Tip: Always watch how the plants take feedings and adjust quantities.
4. Add Missing Nutrients
Look for specific deficiencies, such as calcium or magnesium, and supplement with products like Cal-Mag or chelated mineral solutions.
For example, these supplements can quickly fill gaps in nutrition and promote stronger, healthier growth.
Now, let us learn how to water your cannabis properly to prevent brown spots in your cannabis plant. Here’s how to do that.
Watering Practices to Prevent Brown Spots
Improper watering is the main reason these weed plants turn brown spots. Overwatering or underwatering creates stress that causes unsightly spots on the leaves.
These problems usually creep in without being known until they start reflecting on the healthiness of your plants. Tackle these problems with the following techniques:
1. Balanced Schedules
Water Consistently: Ensure regular watering with slight drying between sessions to avoid waterlogging of the topsoil.
Prevent Root Rot: Keeping soil dry avoids over-saturation and ensures healthy roots.
Use a Moisture Meter: A moisture meter can help a grower determine when the soil is dry enough, which is particularly useful for new growers.
2. Spot the Signs
Identify Overwatering: Overwatered plants have drooping leaves with soft, darkened spots, which are symptoms of root suffocation.
Identify Underwatering: Dry, crispy foliage, brown edges, and leaf curl are the signs of underwatering.
Observe Symptoms Early: The early observation of these issues prevents damage and ensures the plant remains healthy.
3. Ensure Proper Drainage
Use Well-Draining Soil: Your soil should drain excess water easily to prevent it from pooling around roots.
Choose Pots with Drainage Holes: Use pots with proper drainage to prevent root suffocation.
Add Aerating Materials: To improve aeration and drainage, add perlite or vermiculite to your soil mix.
Check for Blockages: To maintain optimal water flow, inspect the pots regularly for blocked drainage holes and clear the obstructions.
4. Establish a Watering Routine
Customize Watering by Growth Stage: Adjust the watering frequency based on the plant’s growth stage. Vegetative plants require more frequent watering than flowering ones.
Monitor Environmental Conditions: Monitor humidity and temperature levels as they directly influence soil drying rates.
Adapt to Dynamic Needs: Adjust in real-time according to changing environmental and plant needs.
Are brown spots appearing on your cannabis plants? They are probably due to overwatering or underwatering, which stresses them. With PlanaCan, you can keep your plants healthy, boost your yields, and maximize your profits!
Understanding environmental stressors and managing them to make your cannabis thrive is the ultimate goal of every grower. Let us learn how to manage them.
Managing Environmental Stressors
Cannabis plants are sensitive to their surroundings. Slight imbalances can cause great stress, often leading to brown spots or other apparent symptoms.
A stable, well-managed environment promotes healthy growth and maximizes yields. Here’s how to manage the environmental stressors effectively:
1. Light and Temperature
Keep the temperature steady between 65 and 80°F. Extreme temperature fluctuations stress your plants, slow their growth, and may cause spotting on the leaves. Grow lights should be kept at the optimal distance from your plants. Too close can cause light burn, and photosynthesis decreases if the lights are too far away.
Tip: Use the automation devices timers and thermostats to regulate light cycles and room temperature automatically.
2. Air Circulation
Adequate airflow prevents heat and humidity build-up, ideal for pests and fungal diseases to thrive in.
Tip: Oscillating fans create a gentle airflow, moving it evenly around the plants. Avoid using blasters that hit the leaves, and good air circulation also hardens the stems, which would carry heavier yields.
3. Humidity Control
Cannabis plants prefer a specific range of humidity at each growth stage. If the humidity is too high when the plants are flowering, this can result in mold or bud rot, and if it is too dry, it can stress the plants.
Tip: Invest in a hygrometer to track humidity levels and humidify or dehumidify accordingly.
4. Consistency is Key
Plants are sensitive to drastic changes in their environment. Quick temperature, light, or humidity changes can shock your plants, interrupting their growth cycle.
Tip: Make a stable environment by monitoring conditions and making gradual adjustments when necessary.
Pay close attention to these environmental factors and stressors and act quickly to promote a healthy and thriving growing environment for your cannabis plants.
So, how do you control pests and diseases in your cannabis plant? Let us learn.
Pest and Disease Control Measures
Some of the common challenges that marijuana cultivators encounter are pests and diseases, causing apparent damage in terms of brown spots and stunted growth.
Managing these properly will be necessary for maintaining healthy plants and optimal yields. Some more detailed ways of preventing and combating pest and disease problems include:
1. Detect Pests
Check for Pests: Inspect your plants for pests among marijuana plants, such as nuts, spider mites, and aphids.
Look for Signs: Check for visible signs, such as holes, tiny holes, or discolouration on the leaves.
Check Leaf Bottoms: Examine the bottom of the leaves since most pests tend to hide there.
Act Fast: Detection is very essential to control infestations before they spread.
2. Integrated Pest Management (IPM)
Tackle the Pests in All Angles: Attack the pests with all means possible to ensure proper control.
Use Sticky Traps: Trap flying pests like fungus gnats effectively.
Introduce Beneficial Insects: Release natural predators such as ladybugs or predatory mites to combat pest populations.
Apply Organic Pesticides: Use neem oil or insecticidal soaps sparingly for additional protection.
Minimize Chemical Usage: Avoid harsh chemicals that may harm plants or the surrounding environment.
3. Sanitation and Cleanliness
Maintain Cleanliness: Regularly clean your grow area to remove debris and minimize pest and disease risks.
Remove Dead Organic Matter: Dispose of dead leaves and plant matter promptly that can harbor unwanted organisms
Sterilize Tools and Equipment: Sterilize all your gardening tools and pots to avoid spreading pathogens
4. Regular Inspections
Inspect Weekly: Schedule weekly thorough plant inspections
Use a Magnifying Glass: Spot small pests that might otherwise go unnoticed.
Identify Early Signs: Look for fungal or bacterial infections, such as mold or dark, wet spots on leaves.
Act Quickly: Address issues early to prevent widespread damage and loss of yield.
Are you struggling to keep up with cannabis growth requirements? PlanaCan‘s interactive calendar makes scheduling weekly plant checks, planning for yields, and managing tasks easy. This way, you can keep everything organized, adjust schedules whenever needed, and ensure no single task is skipped for thriving plants.
5. Disease Prevention
Maintain Proper Airflow: Use fans to ensure consistent air movement, reducing moisture buildup that encourages fungal growth.
Control Humidity Levels: Keep humidity within the ideal range to prevent conditions favorable to powdery mildew or bud rot.
Choose Resistant Strains: Select plant varieties bred to resist common fungal diseases.
Rotate Crops: Rotate planting locations to minimize the risks of soil-borne pathogens.
Treat Infections Responsibly: Use fungicides or organic remedies as needed, ensuring they are cannabis-safe and applied correctly.
By taking a proactive approach and combining preventative measures with responsive treatments, you can keep your cannabis plants safe from the most common pests and diseases and ensure they are healthy and productive throughout their growth cycle.
Conclusion
Brown spots on weed leaves can be frustrating but also open up opportunities for improving cultivation practices.
Diagnosing the root causes, whether they stem from nutrient deficiencies, pests, or environmental factors, and correcting them properly ensures the long-term health of cannabis plants. Maintaining vibrant and productive crops requires constant monitoring, proactive interventions, and proper care.
PlanaCan removes all the guesswork in managing your cannabis cultivation. It streamlines and automates essential processes that make it easy to define and automate cultivation steps, outlining every step for specific strains or cycles-from planting to harvest-through customizable templates. These can be scheduled on an Interactive Calendar, providing a clear visual timeline to organize and monitor tasks.
This powerful tool allows growers to make long-term plans and necessary day-to-day adjustments so that no task is missed regarding the dynamic needs of cultivation. It also facilitates the maintenance of healthy crops and the maximization of yields. With PlanaCan, cannabis growers can maximize their yields, maintain healthier crops, and simplify their cultivation efforts.
Schedule a free call today to see how PlanaCan can change your growing experience!